Friday, July 8, 2011
Ice-Cube Watercolors!
So, yeah...it's summer and really really really hot. At least it is here in Florida. This is perfect for an outdoor painting project. Cool off and make some art!
![]()


Wednesday, July 6, 2011
Garden Signs
Do you have a green thumb? Get your kids involved in the gardening fun too by painting custom garden signs!

For supplies, instructions and step by step photos visit this tutorial on Not Just A Housewife.
Have fun and get messy!
:-) Miss Jenna

For supplies, instructions and step by step photos visit this tutorial on Not Just A Housewife.
Have fun and get messy!
:-) Miss Jenna
Thursday, June 30, 2011
Handprint American Flag
Oh the many things you can do with a handprint! Here's a cute idea borrowed from Muffin Tin Mom...

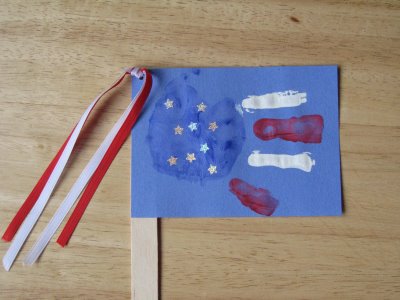
SUPPLIES:
- red, white and blue paint
- blue construction paper
- paint brushes
- popsicle stick
- small star stickers
- glue stick
- scissors/paper cutter
- hole punch
- thin ribbon in red, white, or blue
For step by step instructions click the Muffin Tin Mom link up at the top!
Have fun & get messy!
:-) Miss Jenna
Friday, June 17, 2011
For the Dad With a Sweet Tooth
I'm new to Pinterest. My friend, Suzy sent me an invite to join and I've been slowly figuring out the site and setting my pin boards up. It's a fun and great way to discover and share the plethora of goodies the internet has to offer.
Anyway, my point....
I found this really cute Father's Day card on one of Suzy's pin boards and thought I should share it with you, since the holiday celebrating all things Dad is quickly approaching.

Anyway, my point....
I found this really cute Father's Day card on one of Suzy's pin boards and thought I should share it with you, since the holiday celebrating all things Dad is quickly approaching.

So clever! The credit for this sweet candy bar letter (and photo) goes to the girls at the Bits of Everything blog.
Have fun making it and TRY not to eat it!
:-)
Miss Jenna
Friday, June 3, 2011
Father's Day Gift Bags
Check out these fun DIY gift bags! ...perfect for a Father's Day gift...

Alternative directions: Assemble the box and attach the tie to the top flap first, and add your gift last.
Have fun & get messy!
:-)
Miss Jenna

I found them on Paper Crave via Art Fire. Here's what you need and how to make them....
SUPPLIES:
- gift box template + bow tie / necktie template
- a printer
- cardstock for the box and tie(s)*
- scissors
- a ruler
- a pen or pencil
- glue dots
- double-sided tape
- 1/4 inch circle hole punch (for bow tie box)
- a scoring tool (optional)
- a cutting mat (optional)
INSTRUCTIONS:
Print the box template onto lightweight cardstock, cut out along the solid lines, and assemble according to the directions found in the template file. Place your gift in the box, and use double-sided tape or glue dots to securely close the flap. Print bow tie/necktie templates, cut out, and trace onto your choice of patterned or solid colored paper. Cut out the tie(s) and attach to the box flap using double stick tape or glue dots. If making the bow tie box, punch out three 1/4 inch “buttons” using a hole punch, and attach to the front of the box using glue dots (small Zots are the perfect size).
Alternative directions: Assemble the box and attach the tie to the top flap first, and add your gift last.
Have fun & get messy!
:-)
Miss Jenna
Tuesday, May 31, 2011
Father's Day Picture Frame
Here is a handmade project that your ankle biters can make and give as a gift to the Father figure in their lives. This picture frame can be customized however you like, but here's what I did with my little friend Noah to help celebrate his dad....


SUPPLIES:
- Wood picture frame
- White craft glue (that dries clear) - full strength
- Mod Podge
- Brush or craft sponge - for Mod Podge
- Pieces of decorative paper (thin paper works best)
- Decorative accessories - we used some lightweight hardware, but use anything that makes sense to you or "fits" that particular gift recipient
- Spray paint (optional) color of your choice - I sprayed all the hardware pieces on one side just to have them all coordinate in color
- Photograph of the child with or without Dad
INSTRUCTIONS:
- If you are spray painting your decorative bits and pieces, do this in a well ventilated area away from children before you begin this project.
- Remove the frame backing and glass.
- Have children rip or (with child safe scissors) cut up the paper.
- Have children paint some mod Podge on the frame and decorate the frame with the paper. Paint some more Mod Podge on top of the paper to seal it down and add another layer of paper (if desired)...repeat the last layer of Mod Podge.
- Add some white craft glue (however much you think is needed) to the areas that you wish to put the dried decorative bits and pieces. Let the children pick the placement please. :-)
- Allow the frame to dry completely....this may take a day or two depending on how much glue the little ones use.
- When the frame is dry, add one more thin layer over the entire front of the decorative frame (including the hardware or whatever it is that you've glued) and let dry completely.
- Insert the photograph and replace the backing.
There you have it...easy peezy lemon squeezy! Wrap it up and give it on Father's Day.
Have fun & get messy!
:-)
Miss Jenna
Thursday, May 26, 2011
Preschool Science Stuff!
Need a fun activity to help teach your ankle biters a bit of science? Try balloon rockets!

Check out this link for the "how-to's" :-)
Have fun & get messy!
Miss Jenna

Have fun & get messy!
Miss Jenna
Subscribe to:
Posts (Atom)