Friday, January 28, 2011

Valentine Magnet Gift Idea...

Hi Friends!  So, I thought I'd post a really simple crafty gift idea that you can do with your ankle-biters....handmade magnets.  I'll provide three variations on the idea that you can customize to whatever you want.
Holding up the photo strips of me and my awesome nephews are the magnets I made.  I'll list out the detailed instructions for the LOVE magnets...it's pretty much the same process for the others, so I'll just describe the different steps I did for those.  Ready? Okay!
SUPPLIES (for all):
  • Clear glass flat back cabochons or "blanks" (large & small) - you can find these in most craft stores and even at some dollar stores.  Here's a web source
  • Windex & paper towel
  • A variety of Valentine themed paper
  • White card-stock weight paper
  • Clear alphabet stickers (found in the scrapbook section of craft stores) - this is optional...you could also just write out the letters with a sharpie.
  • Regular all purpose white glue - just be sure it's a kind that dries clear
  • Glue brush
  • Mod Podge
  • Fine glitter
  • Colored pencils
  • Scissors
  • Craft magnets (in sizes that will fit and are smaller than the glass blanks you are using) - these can be found at your local craft stores also.
  • Heavy industrial strength glue like E-6000 - you could also try a hot glue gun, but I'm not going to vouch for the longevity of staying power against the constant pull of magnets.

INSTRUCTIONS (for love) 

1.) Clean the backs of the glass blanks with the Windex to remove any dirt or oils.
2.) Trace the glass blanks onto a pretty paper.
3.) Add your letters (either via sticker or handwriting) to the middle of your circles.
4.) Cut them out and erase any pencil marks along the edges.
5.) Add a layer of the all-purpose white glue to the back of your glass blank.
6.) Place the glass blank onto the letter circle, pressing firmly to ensure that the whole circle is covered with glue and that you won't get air bubbles.
7.) Allow your glass letter to dry.  You may see an overlap of paper...not to worry.  On to step 8!
8.) With your scissors, cut the excess paper.  Cutting the paper on an angle is a good trick...sometimes the rounded glass can get in the way.
Glue your magnets to the backs of the glass blanks with your industrial strength glue.  
{{{NOTE}}}  This is stinky stuff and they recommend using it in a well ventilated area and NOT to be used by children.  Don't let the kids work with this nasty stuff...do this part yourself.
Let them dry for a few hours (or however long the instructions say) 
{{{VERY HELPFUL TIP - that I discovered the hard way}}}  Space these babies out by at least a couple of inches after you add the magnets.  I ended up having them flying at top speed and clumping together...then I got that toxic glue all over my hands trying to pull them apart.  I didn't think about how strong these bad-boy magnets are.

After your magnets are dry, check the fronts of the glass for any glue that may have gotten on there by mistake...this scratches off easily with your fingernail.  Package them up and gift them OR keep them for your very own fridge!

INSTRUCTIONS (for the large & small heart):
Really, the only difference here is using a designed paper.  The thing I will note that I did differently is adding a layer of white card-stock to the back of the heart designed paper.  The heart paper was really thin and you'd be able to see the color of the big black magnet through it.  ((You don't have to do this step if your decorative paper is on the think side.))  Otherwise, follow the same steps as the LOVE magnets.

INSTRUCTIONS (for the hand-drawn version):
These would look so cute with a kids illustration :-)  Here are the altered steps I did...
  • Trace the glass blank onto the white card-stock and draw a design with the colored pencils.  {NOTE} The glass blanks magnify your image slightly, so try to avoid drawing pertinent details to the edge of your circle as they may not show (because of the distortion) when the glass is on.  If you keep the focus of your drawing in the center you should be good.
  • Add a layer of Mod Podge to the drawing and sprinkle your fine glitter...let dry.
  • As with the others, use the white glue to adhere the paper to the glass blank.

Oooo...I just had a thought.  You could also make these magnets with photos!  Just paint a layer of Mod Podge to the front & back of the photo to seal it, preventing the ink from smudging with the other glues...let dry and follow the same steps.

Have fun & get messy!  
:-)  Miss Jenna


Saturday, January 22, 2011

Collage Crafting Tip...

I don't know about you, but I like to be prepared, so it's no surprise that one of the nicknames given to me over the years by my friends is "Mom."

Need a band-aid?  Tissue?  Eye drops?  Gum?  Snack?  Advil?  Nail file? Etc...
Sure enough, I'd have it and what would follow would be a "thanks Mom" from my friend in need.  Now, this kind of makes me sound like I'm a super organized person, but I'll be the first to rat myself out and tell you that's far from the truth.  The band-aid is probably bent in five different directions, the tissues are really just a wad that I grabbed from the box at home and the granola bar is most likely broken into a thousand bits, but I still have it!  My purse has the magic of Mary Poppins...only messy.

My desire to be prepared extends far beyond the black hole of my hand bag.  I always like to have a steady supply of crafting supplies hidden in my studio all locked and loaded, ready to be used.  It may take me a half hour or so to remember where I stashed the particulars, but they are there!

If you want to have an instant art project in your back pocket, just waiting for those desperate and hairy moments when you need entertainment for your ankle-biters, then start collecting paper.  Wooooo!  We're gettin' crazy now....paper!  I'm talking collages people.  My pre-school class loved making collages and if I were to ever get sick at the last minute and not had the opportunity to prepare a full project for my substitute, I could always rely on the fact that my collage stash was there.

  • Scrapbook paper and decorative tid-bits are all well and good, so if you have a bunch of that...awesome.  Save your scraps in a shoe box or something of the sort and keep adding to it.  BUT...sometimes scrapbooking supplies aren't cheap.  SO, here are some tips for bulking up your creative paper supply...


  • Take a trip to Home Depot and pretend you are painting your whole house and grab yourself a bunch of paint swatches.  Cut the rainbow swatches apart and you have a bunch of colorful squares ready to be made into houses or anything else the kids can think of.


  • Check out your local wallpaper store and see if they have any outdated sample books to donate to your cause.  They can offer a lot of textural variety.  We had some given to our pre-school and they were wonderful to have.  
  • If you have magazines or catalogs sent to your home, tear out pretty pages or cut out fun images you like as you are going through them.  These make excellent additions to your collage stash.
  • If you suffer from allergies (as I do) then you might go through massive amounts of tissue boxes.  I always buy tissue boxes that have colorful and funky designs on them because I consider them to be valuable future craft supplies.  When the box is empty, I cut out the pretties and add them to my paper collection!

There are tons of great resources out there to help you bulk up your art supplies on the cheap.  As I think of more, I'll let you know, but right now this is all I have on the collage front.  :-)   If you have some other ideas for inexpensive collage papers, please share with the class!  Your comments are always welcome.

With your well stocked paper supply, scissors, glue sticks, some basic drawing utensils, and some imagination you'll never be stranded without an easy "go-to" collage project.  Have fun & get messy!
:-)  Miss Jenna

Wednesday, January 19, 2011

Heart Sun Catchers!

Can you believe I'm actually getting a head start on Valentines Day projects???  Let's hear it for bein' on the ball!
I was inspired by a sun catcher project that I came across on CrafTown.  I had everything I needed already, so I thought I'd take a stab at it.  It's easy and the end result is really cute...you can either hang these or simply tape them to windows.  These sun catchers would be a great project for parents to do with their youngsters, but teachers can tailor this into individual student projects...they'd look really pretty hung all over a classroom!
SUPPLIES:
  • Wax paper
  • Tissue paper - in Valentine colors (white, red, pink, purple...)
  • Valentine themed confetti - (or make some like I did with different shaped hole punches and pink construction or scrapbook paper)
  • Mod Podge - I used the original gloss formula
  • Paintbrush
  • Glitter
  • Masking tape
  • (optional) Fishing line or a Valentine colored string - I like the fishing line because it's invisible and your hearts will appear as if they are floating
  • (optional) Hole puncher - with a really small hole OR a Needle
  • (optional) Clear Scotch tape

INSTRUCTIONS:
1.) Get all your papers together.  Rip your lighter colors (and a few darker ones) into manageable bits.  Cut out hearts (in varying sizes) out of your darker colors.  If you are making your own confetti, choose a paper that will stand up to a hole puncher...I used a pink cardstock, but construction paper will work well here.  With decorative hole punches (or just a regular ole circle punch), get some aggression out and go to town on that paper.  Get crazy on it!  In no time you'll have a bunch of useable confetti.

2.) Cut a length of wax paper and tape the corners down with the masking tape.  This will keep your wax paper from moving all around while you paint it.  Apply a layer of Mod Podge onto the wax paper with your paintbrush.

3.) Cover the Mod Podge with the bits of torn paper.  The name of this game is layering, so overlapping is fine and dandy.  When you've covered the Mod Podge up with the paper, add another layer of MP over the paper gluing and sealing all paper edges down.

4.) Add your hearts and confetti and when you are happy with your composition, paint over it again with another layer of Mod Podge.  BUT...you want to paint over the hearts gingerly.  You want them to be covered and sealed, but since the MP is sticky, the hearts will want to move with the paintbrush and fold over onto themselves.  Just something to think about.
Let your lovely wax canvas dry completely before moving on.

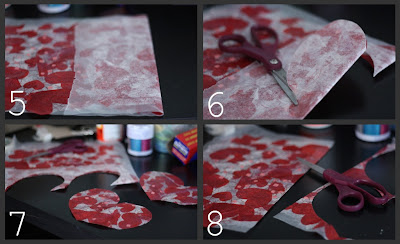
5. & 6.) Now that the MP is dry, it's time to cut!  I wanted to try to get as many hearts out of this piece of decorated paper as possible, so I worked in sections.  You could do the same or make one HUGE heart.  Fold over a section from the end and either lightly draw the half heart shape with a pencil or freehand cut the shape out.

7.) I got two out of that one section, but like I said before, you could just fold the whole wax paper in half, cut out one big heart and call it macaroni.  

8.) Cut the excess paper from your previous cut away and repeat steps 5 and 6.  You should end up with hearts that look something like.....
THIS!
Now...you could stop here, make some Scotch tape loops, add them to the backs of the hearts and beautify your windows.

...BUT...if you want to be able to hang them, continue on to steps 9 & 10.
9.) With your very small hole punch...well...punch a hole in the heart.  Duh!  As long as you don't punch the whole too close to the edge (you want to prevent easy ripping), you can pretty much place the hole anywhere.  If you want them to hang cock-eyed or on a tilt, punch the whole to the top of either side.  If you want it to hang straight, punch it in the center of the heart.  Damn, that sounds violent!  If you want to get "cray cray"...punch a whole at the bottom and hang the heart upside down.  So many possibilities!

10.) Thread your fishing line (measured out the length that you'd like) and tie a knot.  Hang wherever you please... preferably in a place that gets good light.  This is, after all, a sun catcher.  ;-)
I suggest hanging them at varying heights to add some interest.  Can you picture a bunch of these hanging from a ceiling?!  That would look very festive and beautiful.  THE END.
Have fun and get messy!
:-)  Miss Jenna 


Friday, January 7, 2011

Recycled Holiday Card Ornament #1

Happy New Year!  So, I know that it's January and no longer Christmas, but I had the flu for almost two weeks and I'm playing a bit of catch-up right now.  If you still have the holiday cards you were sent this year, you can make this adorable balloon ornament for next years tree!


I found this idea while surfing the genius that is Martha Stewart.  Aside from that little stint in the clink, she's an icon of crafty goodness and I love to check her website/magazine for inspiration.  This seemed easy enough, so I taught myself how to make...it was really easy and turned out cute, so I'm passing it along.  As for kids...this project is more suited to the older child (middle school/high school age)  OR  you could do all the hazardous cutting and poking and allow your little ones to assemble.
SUPPLIES:
  • Holiday cards
  • Ruler
  • Pencil
  • Exacto knife (or scissors if you don't want the older kids wielding a blade) 
  • Cut safe surface
  • Awl (or needle) - to pierce holes
  • 2 Brads (the length of the brad will determine how many strips you can use, thus effecting the fullness)
  • Embroidery Thread or thin ribbon
  • Button
  • Hot glue
  • Ornament hook
INSTRUCTIONS:

1.) You only need the front of the card with the design, so detach it.  {NOTE} size & shape of your card will determine the size & shape of your balloon.
2.) On the backside of the card, mark out with your ruler whatever width you'd like your strips.  The thinner you go, the more you will need to make it a full balloon and that means you need to have a long brad to accommodate the thickness of the stacked strips (this will make more sense in a minute...I hope). I wouldn't go much thicker than what I have marked or you might end up with a slightly boring balloon.
3.) With your straight edge & exacto knife, cut the strips to the measured width.  You could also use scissors.
4.) Pierce a hole with your awl or needle on each end of the cut strips.
5.) Add your strips (via the pierced hole) to your brad until you have just enough room left on your brad to fold the ends back securing the strips. Fan out your strips so they are evenly spaced.  {NOTE} I used a small scrapbooking decorative brad and was able to fit 9 card strips onto it before I ran out of room.  If you use a longer brad, you could fit more.
6.) Start adding your loose strips one at a time to the second brad, but this time have the pointed end of the brad facing out.  You want to be able to close the brad from the outside and not have to reach into the balloon to close the prongs.
7.) Once all the strips are on, fold the prongs down to secure the strips.  You can adjust the strips to space them out better and also gently bend or squeeze the balloon into more of a round shape if it got bent out of whack.
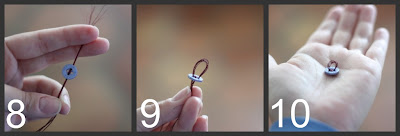
8. & 9.) Now...I'm trying to figure out way to explain this next step without saying "experiment and jerry-rig your button loop"...because that's what I did.  SO, thread your string or ribbon through two holes and double back and thread the remaining two holes.  Go back through one more time, but this time, leave a length of string to create a loop.
10.) with your hot glue, add a dab to the underside of the button to secure the string (leaving the loop in place) and cut the excess thread away.  Jeepers...did that make any sense???
11.) Hot glue your botton to the end of the balloon where the prongs from the brads are showing.  Attach your ornament hook and you're done!  

This is low mess project, but please, have fun and (try to) get messy!  :-)  
~ Miss Jenna ~