Wednesday, January 23, 2013

Fruit & Veggie Valentine

Hi!  It's been a LONG time....so sorry for my absence.  I've been kept very busy by travel and opening my Etsy store.  I have a new website...it's a slow work in progress, but ABA will still be here on Blogger.

Anyway, I had an old apple in my fridge that was starting to wrinkle and I thought I'd make some valentine prints with it!  No doubt, you've seen this project....it's been around forever, so I'm showing you nothing new.  BUT...even I had forgotten about this golden oldie of a Valentine project, so I thought I'd post it just on the off chance that someone out there hasn't seen fruit & veggie prints.  THis is great for DIY Valentine cards or just for a dun painting project.

It's as simple as 1, 2, 3...
Get an apple or potato and slice a bit off.
With a knife cut the shape of your heart...or whatever then cut away the surrounding part of apple.
Press onto a paper towel to remove excess moisture then dip into paint and print!

Have fun & get messy!
:-) Miss Jenna

Sunday, March 4, 2012

Blarney Stone Craft

It's Time for my favorite color.....GREEN! And time to celebrate St. Patricks Day, but personally, I like celebrating green more.  :-) 
Have your Ankle Biters make their very own Blarney Stones to smooch!  Not familiar with the Blarney story?  Here it is in short....

In southwestern Ireland, there is a very famous stone, called the Blarney Stone. It is located high up in Blarney Castle. If you kiss the Blarney Stone (while in a very awkward upside down manner...Google images), it is supposed to give you the gift of eloquence.


Essentially, here's what you need:
photo source

+
A smooth rock & some green paint

Other supplies:
  • brush
  • glue
  • black Sharpie marker
  • glitter, sequins, plastic jewels, googly eyes, bits of yarn, etc.
Instructions:
Clean and dry rock.  Paint it green and let paint dry completely.  Its pretty much done now, but if the wee ones would like to further embellish their Blarney stone by making a face with the marker or gluing glitter and other stuff, by all means, let em go at it.....just make sure they're good and dry before the smoochin' starts ;-)

Have fun & get messy!
~  Miss Jenna


Friday, December 16, 2011

DIY Holiday Snow Globes with You Inside!

Man, I love Pinterest.  It's so helpful when I'm either too lazy to come up with a holiday craft to share with you or just too busy.  Lately I'm just too busy.  Please don't feel slighted....I have a lot going on right now.  BUT!  Thanks to Pinterest, I found this freaking adorable holiday craft for you!

DIY HOLIDAY SNOW GLOBES!

I mean, seriously....how cute are these?!  I want to be in one!  Maybe when all this crazy settles down, I'll craft one up.  This tutorial comes from Our Best Bites.  They also have some really great recipes, so give this site some well deserved attention.  

To get the how to's click HERE!
Have fun & get messy!
:-) Miss Jenna 


Thursday, December 1, 2011

Pom Pom Ornaments

So...yeah.  I skipped right over Thanksgiving crafts this year.  Many apologies...it's been a hectic few months.  Moving on to the next holiday!  CHRISTMAS!!!  Here is a very kid friendly craft to help decorate your tree.  Head over to Skip To My Lou for the full tutorial.  :-)  Have fun & get messy!
~ Miss Jenna


Saturday, October 15, 2011

Make Halloween Treats More Fun....

...by making these recycled bread tag monsters!


I'm one of these people who looks at most random things that I may find on the ground outside or laying around in my house who wonder...."Hmmm.  I wonder what I could make out of that?"  But never have I looked at those annoying little bread bad tags and considered the crafty possibilities.  Luckily, Amanda from Crafts by Amanda, did.  What a cute idea!
Have fun & get messy!
 :-)  Miss Jenna

Thursday, September 29, 2011

Halloween on Pinterest

Halloween is around the corner...a time for junk food and creepy crafts.  Here are some spooktacular possibilities for you and your ankle biters.
Have fun and get messy!
:-)  Miss Jenna

Saturday, September 24, 2011

Ready for some fun???

Who wouldn't love to play around with this thing?!  I think you and your family should give your construction skills a try and build this totally awesome marshmallow catapult.

Have fun and get messy!
:-)  Miss Jenna  :-)

Thursday, September 8, 2011

DIY :: Play-Doh

When I taught pre-school, the teachers would go in a rotation to make our own Play-Doh for our ankle biters.  I mean, a school could go broke if they had to keep buying it and the stuff dries out so fast....so make it!  I couldn't find a recipe like the one we used, but this one is really close.  The only thing we didn't use was the Kool-Aid.  I'm sure it makes the play-doh smell good, but that also seems like it would lead to a lot more eating of it than playing with it.  ;-)


INGREDIENTS:

  • 1 cup flour
  • 1/2 cup salt2 t cream of tartar2 packages of Kool Aid (don't use purple, it turns grey)
  • Food Coloring (optional)
  • 1 T oil
  • 1 cup water

INSTRUCTIONS:
Cook all ingredients over medium heat until it forms a ball (5-10 minutes).  You can enhance the colors by using food coloring if you like.  That's it!  Eazy Peezy Lemon Squeezy.


Have fun & get messy!
:-)  Miss Jenna

Saturday, September 3, 2011

SCIENCE :: Growing Stalagmites

Hello Ankle Biter Art Friends!  It's been awhile since I stopped by, huh?!  Sorry about that....been busy over at Diary of a Featherhead getting that established, making jewelry and other artsy things and working on a play!  I haven't gotten together with my little ankle biter helpers Sam & Molly in a long while, so I don't have a homemade kid craft to share with you today, BUT I do have this great link to a fun science project!


Click THIS LINK for instructions...it will take you to a wonderful blog called Everyday Art.  I hope you and your little mad scientists enjoy this one!

Until next time...have fun and get messy!
:-)  Miss Jenna
p.s.  I'll try not to stay away for too long next time.

Wednesday, August 17, 2011

The Artful Parent

Hello Ankle Biter Art Friends!
Today, I would like to tell you about a super mom and columnist that I found on the Internet.  When I grow up and become a mom someday, I hope I can provide as creative an environment for my children as she does for hers.  Allow me to introduce you to Jean, The Artful Parent.  I've only been following her blog for a few months now, but I am endlessly inspired and impressed.  So, instead of me sharing everything of hers that I think is wonderful on my blog and just linking you over to her at The Artful Parent, I think you should add hers to your reading list.  She posts wonderful projects and activities that are not just helpful to moms, but to teachers as well.  Here are some of my favorites that she's shared recently...
Rainbow Stained Glass Window

Column for WNC Parent
Scavenger Hunt & Make

Ice Sculptures with Salt and Liquid Watercolors

And there you have it!  I highly recommend following her blog.  She does a great job...much better than I, but still follow me too.  ;-)
p.s.  She has a Facebook page too, so that's an easy was to follow her if you're not down with the RSS.  The Artful Parent - Facebook Link

As always...have fun and get messy!
~ Miss Jenna

Friday, August 12, 2011

Handprint Fish


         Source: walkingbytheway.com via Heather on Pinterest

Yet another thing to do with handprint.  How cute is this?!  You could pair this project with some fun reading too.  Like....


OR


Have fun and get messy!  
:-)  Miss Jenna


Saturday, July 30, 2011

Color Learning Scavenger Hunt

Hello Friends!

I wanted to share this Richards Family Four activity with you!  It's great for a rainy day or a day that's just too hot to let your ankle biters outside in fear that they will melt.  Who doesn't love a scavenger hunt?  I mean, I'm 30 years old and still love the idea of it.  This color learning activity is great for young ones, but also for the older child who might be starting to learn the basics of another language.  If you're looking for a fun and educational activity to pass some time, give it a try.  It just takes a little preparation and set-up.

Gather little bits and pieces in the colors to be found and scatter them throughout the house (or classroom).  Make designated and marked color coordinated containers that have the corresponding name and that's pretty much it!  Let the ankle biters search and retrieve...it's sure to keep them occupied for at least a little while.  :-)


Have a fun and messy weekend!  
:-)  
Miss Jenna

Friday, July 8, 2011

Ice-Cube Watercolors!

So, yeah...it's summer and really really really hot.  At least it is here in Florida.  This is perfect for an outdoor painting project.  Cool off and make some art!


Have fun and get messy!
:-)  Miss Jenna

Wednesday, July 6, 2011

Garden Signs

Do you have a green thumb?  Get your kids involved in the gardening fun too by painting custom garden signs!


For supplies, instructions and step by step photos visit this tutorial on Not Just A Housewife.
Have fun and get messy!
:-)  Miss Jenna

Thursday, June 30, 2011

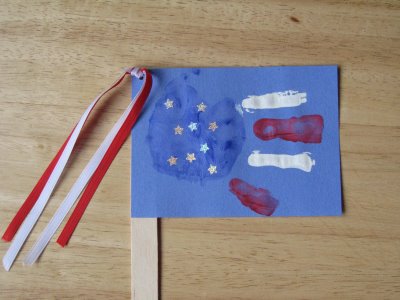
Handprint American Flag

Oh the many things you can do with a handprint!  Here's a cute idea borrowed from Muffin Tin Mom...
SUPPLIES:
  • red, white and blue paint
  • blue construction paper
  • paint brushes
  • popsicle stick
  • small star stickers
  • glue stick
  • scissors/paper cutter
  • hole punch
  • thin ribbon in red, white, or blue
For step by step instructions click the Muffin Tin Mom link up at the top!
Have fun & get messy!
:-)  Miss Jenna

Friday, June 17, 2011

For the Dad With a Sweet Tooth

I'm new to Pinterest.  My friend, Suzy sent me an invite to join and I've been slowly figuring out the site and setting my pin boards up.  It's a fun and great way to discover and share the plethora of goodies the internet has to offer.

Anyway, my point....
I found this really cute Father's Day card on one of Suzy's pin boards and thought I should share it with you, since the holiday celebrating all things Dad is quickly approaching.


So clever!  The credit for this sweet candy bar letter (and photo) goes to the girls at the Bits of Everything blog.

Have fun making it and TRY not to eat it!
:-)  
Miss Jenna

Friday, June 3, 2011

Father's Day Gift Bags

Check out these fun DIY gift bags!  ...perfect for a Father's Day gift...


I found them on Paper Crave via Art Fire.  Here's what you need and how to make them....

SUPPLIES:
  • gift box template + bow tie / necktie template
  • a printer
  • cardstock for the box and tie(s)*
  • scissors
  • a ruler
  • a pen or pencil
  • glue dots
  • double-sided tape
  • 1/4 inch circle hole punch (for bow tie box)
  • a scoring tool (optional)
  • a cutting mat (optional)


INSTRUCTIONS:
Print the box template onto lightweight cardstock, cut out along the solid lines, and assemble according to the directions found in the template file. Place your gift in the box, and use double-sided tape or glue dots to securely close the flap. Print bow tie/necktie templates, cut out, and trace onto your choice of patterned or solid colored paper. Cut out the tie(s) and attach to the box flap using double stick tape or glue dots. If making the bow tie box, punch out three 1/4 inch “buttons” using a hole punch, and attach to the front of the box using glue dots (small Zots are the perfect size).
Alternative directions: Assemble the box and attach the tie to the top flap first, and add your gift last.


Have fun & get messy!
:-)
Miss Jenna

Tuesday, May 31, 2011

Father's Day Picture Frame

Here is a handmade project that your ankle biters can make and give as a gift to the Father figure in their lives.  This picture frame can be customized however you like, but here's what I did with my little friend Noah to help celebrate his dad....


SUPPLIES:
  • Wood picture frame
  • White craft glue (that dries clear) - full strength
  • Mod Podge
  • Brush or craft sponge - for Mod Podge
  • Pieces of decorative paper (thin paper works best)
  • Decorative accessories - we used some lightweight hardware, but use anything that makes sense to you or "fits" that particular gift recipient
  • Spray paint (optional) color of your choice - I sprayed all the hardware pieces on one side just to have them all coordinate in color
  • Photograph of the child with or without Dad


INSTRUCTIONS:
  1. If you are spray painting your decorative bits and pieces, do this in a well ventilated area away from children before you begin this project.
  2. Remove the frame backing and glass.
  3. Have children rip or (with child safe scissors) cut up the paper.
  4. Have children paint some mod Podge on the frame and decorate the frame with the paper.  Paint some more Mod Podge on top of the paper to seal it down and add another layer of paper (if desired)...repeat the last layer of Mod Podge.
  5. Add some white craft glue (however much you think is needed) to the areas that you wish to put the dried decorative bits and pieces.  Let the children pick the placement please.  :-)
  6. Allow the frame to dry completely....this may take a day or two depending on how much glue the little ones use.
  7. When the frame is dry, add one more thin layer over the entire front of the decorative frame (including the hardware or whatever it is that you've glued) and let dry completely.
  8. Insert the photograph and replace the backing.


There you have it...easy peezy lemon squeezy!  Wrap it up and give it on Father's Day.
Have fun & get messy!
:-)  
Miss Jenna

Thursday, May 26, 2011

Preschool Science Stuff!

Need a fun activity to help teach your ankle biters a bit of science?  Try balloon rockets!


Check out this link for the "how-to's"  :-)


Have fun & get messy!
Miss Jenna

Tuesday, May 24, 2011

Cookie Recipe with Activity for Your Ankle Biters

I saw this really cute idea (and what looks to be a good cookie recipe) on Craftaholics Anonymous and just had to share.  Blog sharing is the easy road for me right now with Ankle Biter Art because I just don't have time to make projects right now.  We hired the movers today and move in 38 days!!!  CRAZY.

If you have children or work with them, then surely you know the book If You Give A Mouse A Cookie.  Below you'll find a recipe for you and your Ankle Biters to make together....kids LOVE to help cook and bake...at least that's what I've always found.  This might be tricky if you're in a school setting, but with a little creative thinking, I'm sure you could find a way to involve the children in the baking process.  Below the recipe, you'll find fun activities that link the baking and book together!  :-)

Best Chocolate Chip Cookies
(or you can substitute your favorite tried & true recipe)

1/2 cup shortening
1/2 cup softened butter
1/2 cup sugar
1 cup brown sugar
1/2 teaspoon baking soda
2 eggs
2 teaspoon vanilla
2 1/2 cups flour
1-2 cups chocolate chips

Mix shortening and butter. Add both sugars and baking soda. Beat together. Beat in eggs and vanilla. Add flour. Place on greased cookie sheet and back for 8 minutes at 375 degrees.


"While the cookies bake, read the book If You Give a Mouse a Cookie and do some of the activities that the mouse does in the book, for example we:

  • swept the kitchen floor {yay for a clean floor!}
  • drew a mouse picture with crayons and don’t forget to sign their name!
  • hang the mouse picture on the refrigerator {for bonus points, use scotch tape like the book }
  • get a cold glass of milk
  • and then…… enjoy a warm cookie from the oven with that cold glass of milk!"

Thank you Linda from Craftaholics Anonymous, for helping me have content on my little neglected blog by sharing your clever and cute idea.
Have fun & get messy!
Miss Jenna
:-)