Tuesday, September 21, 2010

Tackling Technology...and Someday a Blog Header.

I have never been the most technologically savvy girl and although I'm quite creative and crafty in the hands-on realm of artsy things, I am embarrassingly clumsy with doing anything creative on a computer. In my early PC days, my poor boyfriend (now my awesome husband) would ever so patiently have to fix all the things I managed to do wrong on my computer...and I screwed up EVERYTHING...a lot. Doug (the husband) is a staunch Microsoft PC guy and is very quick to slam Apple, but when it came time for me to get a new computer, he said something to the effect of..."Good grief woman, get a Mac!" Maybe I'm dramatizing a bit, but it was he who suggested that perhaps I would gel better with a Mac, and he was so right. Who breathed a big sigh of relief when she discovered that she wasn't a total ditz with computers? Yep, this girl.

iLoveMacModern1680x1050.jpeg
Mac Love


I "get" Macs. They make things easy for me and they appeal to my desire to look at pretty things. I can figure most things out on my own and I don't screw up nearly as often as I did with PC's. Best of all, I don't have to constantly make Doug recover things that I lost! All that being said...I still SUCK as doing creative things on a computer! Granted, I haven't put too much effort into learning.

A portrait of Miss Jenna.jpeg
A portrait of "Miss Jenna"


I edited this drawing that one of my Kindergartners did of me on Pixlr.com ...seriously what I did in an hour could've been done by most normal people in 10 minutes. Cropping, removing the name of the child to insert "Ankle-Biter Art", and painting out the lines of the paper (badly)....this is what I did and I am THIS proud? Lame. Now I just have to figure out how to make the image into a header for this blog! Look for that in 2011.

So, I've graduated from a pathetically inept PC user to an adequate Mac lover. I then discovered Facebook, thanks to the encouragement of my friend Suzy...and then the world of blogging. Oh my, what a community THAT is! I had no idea. Blog reader becomes blogger...and now we're pretty much caught up! Ankle-Biter Art now has a Facebook page! Dare I say I'm blossoming into a bona-fide computer junkie? Oh...and I've been trying out Twitter too!  FeatherheadArt ... Amazing. One day I'll figure out how to make beautiful things using Photoshop or Illustrator.

Kids these days are light years ahead of me, with having the computer access and education they do now. All I did on a computer in grade school was play the Oregon Trail and Where in the World is Carmen Sandiego?

Fall art project are coming soon! Until then, have fun & get messy! - Jenna

Thursday, September 16, 2010

Scratch Art & Creating a Narrative

I worked at a private elementary school for a year as an assistant to the pre-K and Kindergarten art teacher and the days when she was out were the BEST because I was the automatic substitute.  The following is a project I did with the kindergartners on one of those days.

I was going for something simple with little clean-up since it was just me and BIG group of kids throughout the day, so I decided on having the children do a narrative drawing on Scratch Art paper.  What (you might be asking) is Scratch Art paper?  It's a double layered paper, the bottom being a glossy rainbow pattern with a top coat of a thin white or black film that is easily scratched off (much like a lottery ticket) with an included wooden stylus.  I have seen it at my local craft stores, but if you can't find it locally, you can order it online from DickBlick.com

I'll admit that I was a little unsure about this project with this particular group of kids...they could be really challenging...high energy, behavioral issues, and the boys GREATLY outnumbered the girls.  My concern was that this project (being super simple with only two non-messy supplies) was going to bore them into attempted chaos.  My goal was for them to come up with an original story that they would illustrate using the scratch paper.  After showing them how to use the paper, I of course had to introduce them to the very pointy wooden stylus with specific instructions that it was to be used ONLY for the scratch paper and NOT as a lightsaber.  Star Wars was big with this group.  You dig?  ;-)  Then the kids and I made up a story (everyone got a quick turn to add to it) and I drew it on the board as we went along.  I can't remember it exactly, but I know it was super silly because we were all laughing about it.  I really stressed the importance of them creating their VERY OWN story from their VERY OWN awesome brains in an effort to avoid having ten drawings of the exact same Star Wars battle scene....and then they started scratching away!

I was astonished at how quiet this rowdy bunch became as they started scratching out their stories illustrations.  They sat still.  They weren't antagonizing each other.  They were LOVING this...and so was I!  I had permagrin.  Before class ended I went around to write down their stories.  Some just said a few sentences while others had me feverishly writing a whole paragraphs worth.  
I absolutely LOVE "kid-speak"...the way they form backwards sentences and mis-pronounce things....it's my favorite, so I'm always sure to write word for word (misspellings and all) what they say.  I don't have any copies of the stories that I transcribed, but I did manage to get a copy of two of the masterpieces....

I mean...I seriously had a fit over the one on the bottom.  How awesome is that!?!?  Preston rocked it out.  A shark coming out of a snake, an elephant (my favorite creature on this earth) with four tusks, and a killer alien in a spaceship with tractor beams!  He was one of those super duper creative kids...very interesting little dude.
Peter (the young artist on the top) was one of the kindest and most mellow boys that I've ever taught.  I really loved him...he seemed so mature for his age and was very artistic.  He made some really beautiful artwork.  I really loved the border around his illustration.  
There were SO many great ones....I wish I had photocopied them all along with the stories.  The kids and I had so much FUN with this project and it was by far the easiest and best day I'd had with them.

How this project is educational:
Of course this project is fun, but there is also some really quality educational lessons in here too.  
  • Asking your child to create a narrative is a task that requires the use of a variety of skills like
    • organization
    • sequencing
    • establishing a main idea 
    • perspective
  • There are several different ways you could approach this narrative project
    • have them create a fictional story (like I did with my class)
    • have them recount a personal experience or a dream
    • have them interpret a book, movie or show that they like
  • Creating a narrative also helps develop a child's auditory and vocal skills, which in turn, helps them develop their reading and spelling skills.  Children need to use the language that they hear and speak to most effectively get the reading and writing to take off.  I don't want to sound preachy, but try to use every opportunity to create a dialog with your children and give them equal opportunity to talk to you.  This is feeds them in SO many ways.

Have fun & get messy!
- Jenna  :-)

Sunday, September 12, 2010

DIY dyed pasta & rice

Dyed pasta or rice was in constant supply at my pre-school.  This is an easy DIY tutorial...very kid friendly, if you'd like to have them help you.  :-)

DYED PASTA & RICE:  for crafting & eating

There are two recipes for dying pasta and rice.  One uses rubbing alcohol (this is for crafting ONLY) while the other uses white vinegar (this is the food safe edible version).  Since we never cooked and served our dyed pasta, the recipe we used was the one with the rubbing alcohol.  Both versions are essentially the same, the only difference is the liquid.


SUPPLIES
  • Mixing containers: glass bowls OR glass jars with lids (like empty pasta sauce or mason jars) OR plastic ziploc bags.  Number of containers needed will depend on how many different colors you'd like to make.
  • 1 or 2 cookie sheets
  • For drying: Line your cookie sheets with one of the following...wax paper, several layers of news paper or kitchen towels (old or dark towels that you don't care too much about).  I wouldn't recommend using paper towels, it's a little flimsy when wet and the pasta/rice might stick to it while drying...just creating more work for you.  I find the kitchen towels easiest. 
  • Pasta: variety of fun shapes and tube pastas
  • Rice: plain white rice
  • Rubbing alcohol or white vinegar - enough to just cover the pasta  (NOTE: only the pasta/rice dyed with vinegar is edible)
  • Food coloring (the traditional little teardrop liquid food dyes are perfect)
  • Latex gloves (optional)...if the food coloring gets on your hands, it won't be there forever.  ;-)
  • Colander (optional) keep in mind that this project might stain a white plastic colander...you could also use a slotted spoon.


INSTRUCTIONS:
  1. Divide your pasta/rice into your mixing containers
  2. Add liquid (either alcohol or vinegar) just enough to cover the pasta/rice
  3. Add your drops of food coloring (5-10 drops depending on size of your container and how intense you'd like your color).  You can use the food coloring as is (they usually come in primary colors) or combine them to make new colors....like red + blue = purple...the box of food coloring should have a color mixing chart on the back with color recipes.
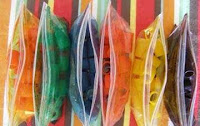
  4. If you are using glass bowls, stir to mix the colors and coat the pasta/rice.  If you are using jars, screw on the lids and give 'em a shake.  If you are using ziploc bags, zip tight and gently shake or squeeze to blend and lay on cookie sheets in case of leakage. 
  5. The longer they sit, the more vivid the color.  When I did this for the school, I would let them soak between 2 and 4 hours (some colors soak in really quickly while others, like yellow or orange, can take a little longer).  Check on your containers every half hour or hour and give the contents a quick mix to make sure all your pasta or rice gets good coverage...(the jars are easy and fun for the kids...have them hold a jar tight and do a little shake and a shimmy!
  6. Drain with a colander (For Rice: line colander with paper towels so you don't loose a bunch through the holes) or use a slotted spoon to remove pasta/rice from container and place in a single layer on your cookie sheets (lined with wax paper, newspaper or kitchen towels) to dry.  The colors will brighten as the pasta and rice dry.
Jar option
Plastic bag option (you can use sandwich size or larger bags for more pasta)


VoilĂ !  You now have fun and colorful pasta & rice!


PROJECT IDEAS:
  • You can use your fun shaped pasta & rice for glue projects
  • Tube pasta can be used to string necklaces and garlands (stringing is fantastic in helping children develop their fine motor skills)


EDUCATIONAL USES:

Dyed pasta is not only limited to gluing and stringing...we often used it as an educational opportunity in our classrooms.
  • SORTING & GROUPING:  Sorting is a beginning math skill.  Having children match up objects that have traits in common (in this case...the pasta's shape & color) helps them develop and organize these pre-math skills.
  • PATTERN RECOGNITION: Being able to identify what comes next in a pattern is also an important pre-math skill.  Use the colorful tube pastas that you've made to practice pattern making with your kids!  Stringing necklaces and garlands is perfect for this.


COOKING:
How fun would it be to have your project also be a part of your dinner?!  AGAIN...be sure you made these colorful creations with vinegar and NOT alcohol.
Using a dark tomato sauce kinda defeats the purpose of the colored pasta, but how about some simple and yummy buttery pasta that shows off the colors!?!  OR...some awesome green rice or perhaps a rainbow rice ball? I mean...what kid wouldn't at least try this?


{all photos for this blog post were found via Google image search}


I hope you and your lil ankle-biters enjoy this project.  Until next time...have fun & get messy!
- Jenna


Friday, September 10, 2010

RESOURCES AND BASIC SUPPLIES...I promise to post an art project soon.

The great thing about kids, regarding art, is that they don’t know a lot about quality yet.  That may sound lousy, but when it comes to art supplies, they don’t know the difference between artist quality paints and regular tempera paint...and this is awesome because it means that (for the most part) art supplies for children are really affordable.  In this post, I’ll provide you with a list of basic art supplies that are great to have around the house.  Of course you don’t need to go out and purchase everything on this list, but I thought it would be helpful to offer some basics to pick and choose from.  It’s always good to have SOME sort of crafty supplies when there are kids around.  I mean, they instinctively know what to do with them for the most part!  Sometimes there doesn’t need to be any sort lesson beforehand or planned project...just put some art supplies down and let them go to town and entertain themselves!

Local craft stores (like Michaels or Joann Fabrics) are FANTASTIC places to buy affordable arts & craft supplies, but if you want to shop on-line, (Dick Blick, Art Supplies DirectLakeshore, and Growing Tree Toys ) are some good resources.  Also, start thinking about what everyday things you use at home that might normally be thrown away (like paper towel & toilet paper rolls, bottle tops to milk or juice jugs, those styrofoam packaging trays that some foods from the grocery come in, plastic food tubs w/ lids, shipping boxes & styrofoam peanuts...etc...)  There are crafty projects and uses for all of these things, so it’s a good idea to start saving things like this (if you have a little space in your home to stock them away).


BASIC ART SUPPLIES


PAPER:
  • Regular drawing paper (notebook size)
  • Large drawing pad (I recommend getting a heavier weight paper so you can use it for painting, collages, and drawing).  Remember that you can always cut this paper to size if you want a smaller piece.
  • For covering the work table you can re-use old newspapers or get a large pad of plain newsprint.
  • Easel paper...you can either buy a roll of easel paper or just tear out sheets from your large middle weight paper tablet.
  • Finger painting paper....there IS a difference.  Pros: it has a smooth & shiny surface to help fingers glide easily and is a little more resistant to wetness and tears.  Cons: it takes a lot longer to dry than normal paper and it’s not really good for other paints (as they are thinner than finger paints and will drip and run like a sick child’s nose).  
  • Colored construction paper
  • Thick/stiff paper like bristol board (can be found at art/craft stores), recycled cardboard pieces like cut up shipping boxes or shoe boxes...these are great foundations for glue projects.
  • Start collecting random papers (like magazine/catalog clippings & old calendars) for collages.


DRAWING:
  • Crayons - large size for tiny hands (2-3 year olds) and regular size for older kids whose fine motor skills are more developed.
  • Washable markers
  • Colored pencils - for pre-K children and older
  • Mr. Sketch Smelly markers by Sanford.....are so fun...kids love them.  You can find them on-line & sometimes in art/craft stores and office supply stores.


PAINTING:
  • Tempera paint (can be found at most art/craft supply stores).  I always mixed my paint colors with very diluted soapy water...use an old dish soap bottle with about a tablespoon (or less) of soap & fill with water...keep this with your paint supplies.  I did this for several reasons... (1) Sometimes I wanted the paint to be a little thinner. (2) It really helps the paint clean off the children easier. (3) It makes it easier to clean up the brushes and paint containers because the soap is already in there!
  • Paint containers - if you don’t want to buy the no-spill paint containers, there are many household options! Recycle your styrofoam trays from the grocery, or use pie tins or shallow plastic dishes (that won’t be easily knocked over)
  • Tempera Cakes placed in individual dishes are an alternative to liquid tempera paint.  Cons: you have less control of creating certain colors.  Pros: the kids just need a cup of water and a brush & easier clean-up.

  • Watercolor sets (use heavier paper with some texture...not totally smooth)
  • Finger paint.  Yes it is soooo messy, but the kids love it and it’s good for their perception of touch.
  • Brushes in a variety of sizes.
  • Drying rack - NOT a necessity, but it sure is nice to have one.  Alternative - Lay flat on the ground (especially if REALLY wet) or string a clothes line outside, on your porch or balcony, or in a room and hang paintings with clothespins to dry.  (If in a room, place a drop cloth below in case of drippage.
  •  Easel - these come in a variety of pricepoints...I really suggest getting one and most likely (with some research) you’ll be able to find one that fits within your budget.                                                          


GLUE:
  • One word...ELMER’S!  Elmer’s white school glue rocks.  Have you ever thought of mixing your left over paint into a small container with some Elmer’s glue?  Colorful glue!  Love it.  Start saving containers with lids from grocery foods (like used up butter tubs or shallow sour cream tubs).  You’ll be able to have a variety of colored glue on hand!
  • Elmer’s glue sticks
  • Glue brushes - I like to use short metal craft brushes that you can find at your local craft store...they are really cheap, durable and clean easily.  


RANDOM: (almost all of these can be found at your local craft store)
  • Child-safe scissors.  Don’t be afraid....cutting is an extremely helpful tool in developing your child’s fine motor skills, BUT they will probably cut a chunk of hair off of their head without supervision, so keep that in mind.  ;-)
  • Stamp pads & stamps (I love this ink-pad large enough for a child’s hand...so easy!)

  • Sponges for sponge painting.  Miracle Sponges are awesome!  They are packages dry & flat so you can draw your own design on them (or use a stencil), cut it out and then when it's wet, you have a customized sponge shape!
  • Popsicle sticks (large & small)
  • Start collecting buttons or pieces of scrap fabric...any small knick-knacky things you like that would be fun to glue onto a project.
  • Glitter and/or colored sand
  • pom-pons
  • Pipe-cleaners
  • Foam pieces and foam sheets 
  • Wiggle-eyes = instant creature.  


I hope someone out in cyber space will find this helpful!
Have fun & get messy!
- Jenna

Monday, September 6, 2010

An Introduction to Ankle-Biter Art!


"Every child is an artist. The problem is how to remain an artist once we grow up." - Pablo Picasso

HOORAY for my first post for Ankle-Biter Art!!!  Here’s a little bit about me...
I have always been a creative and crafty chick and I love anything that has to do with art.  I’m happiest when I’m creating something and I LOVE to get messy in the process.  I’m about to turn 30 this year and there are a lot of exciting things happening.  I’m an artistic dabbler...I haven’t met an art medium that I didn’t fall in love with...BUT primarily, I’m a jewelry designer.  I was fortunate to go to a high-school where they offered silversmith classes and that’s where I met the art of my life.  I learned how to wield a torch and to bend, saw and solder metal as well as set stones.  It is now my job to create jewelry and I have finally given myself permission to call myself an artist.  My Etsy Store will be up and running soon, so please stop by sometime in the future and have a look!  

Before I became a full time artist most of my jobs were in the childcare field.  I graduated with a Bachelors in Psychology (where my studies were focused on early childhood development) and I also minored in Studio Art.  I worked in social services for awhile where I did developmental assessments for low income children (ages 5 months to 6 years old) and their child care facilities.     
Prior to all of that, I taught pre-school for 7 seven years and art was a HUGE part of our curriculum.  I had also been a nanny (for three years) and all in all, I’ve pretty much babysat for almost 20 years.  One thing I know for certain...I KNOW KIDS.  :-)

I believe that art is an ESSENTIAL learning tool in early childhood development.  Not only does it stimulate their brain, but it helps develop and fine-tune their motor skills, communication and creativity.  It builds confidence and it’s FUN!  One thing that is imperative to me, when working with children, is that the art project is not about the end result.  It’s about the process not the product.  If you follow this blog, you’ll be reading that A LOT.  All the learning and joy takes place in the act of creating and making art.  The exploration and the getting messy is all a part of it too and the children are so proud of what THEY have made...even if the artwork is a big gluey wet mess with nothing identifiable to us “grown-ups.”  I’m not going to name name’s here, but I’ve worked with some teachers who insist on telling the children what to add and what to do or not to do...and even WORSE...they re-arrange and fix the kids artwork themselves!  Oh my skin would crawl and fists would ball....and I’d have to bite my tongue.  I don’t believe parents want the teacher’s artwork hanging on their fridge.  They want what their child has created with their tiny two hands.
When I was teaching, I would introduce the project du jour at circle time.  I’d show them all of the supplies that we’d be using and I’d give them ideas on how to use them by making a little version of my own.  Afterward, I would have them give me suggestions of other ways they could do this project.  It was an opportunity to get them involved in a creative dialog and for them to be assured that none of their ideas were "wrong" so that self-esteem or lack of confidence was a non-issue.  This was also helpful in getting their minds thinking creatively....and then they were off to make whatever their hearts desired and I was just there to give encouragement and praise and to clean up the mess.

My goal for this blog is to help you find fun arts and craft projects so that you can help your children learn and grow and have fun with them at the same time.  Now I’m off to dig in my old lesson plan books for art projects to share.
In the meantime, have fun and get messy!  - Jenna